
MaxAI Multi-Tenant Setup
Overview
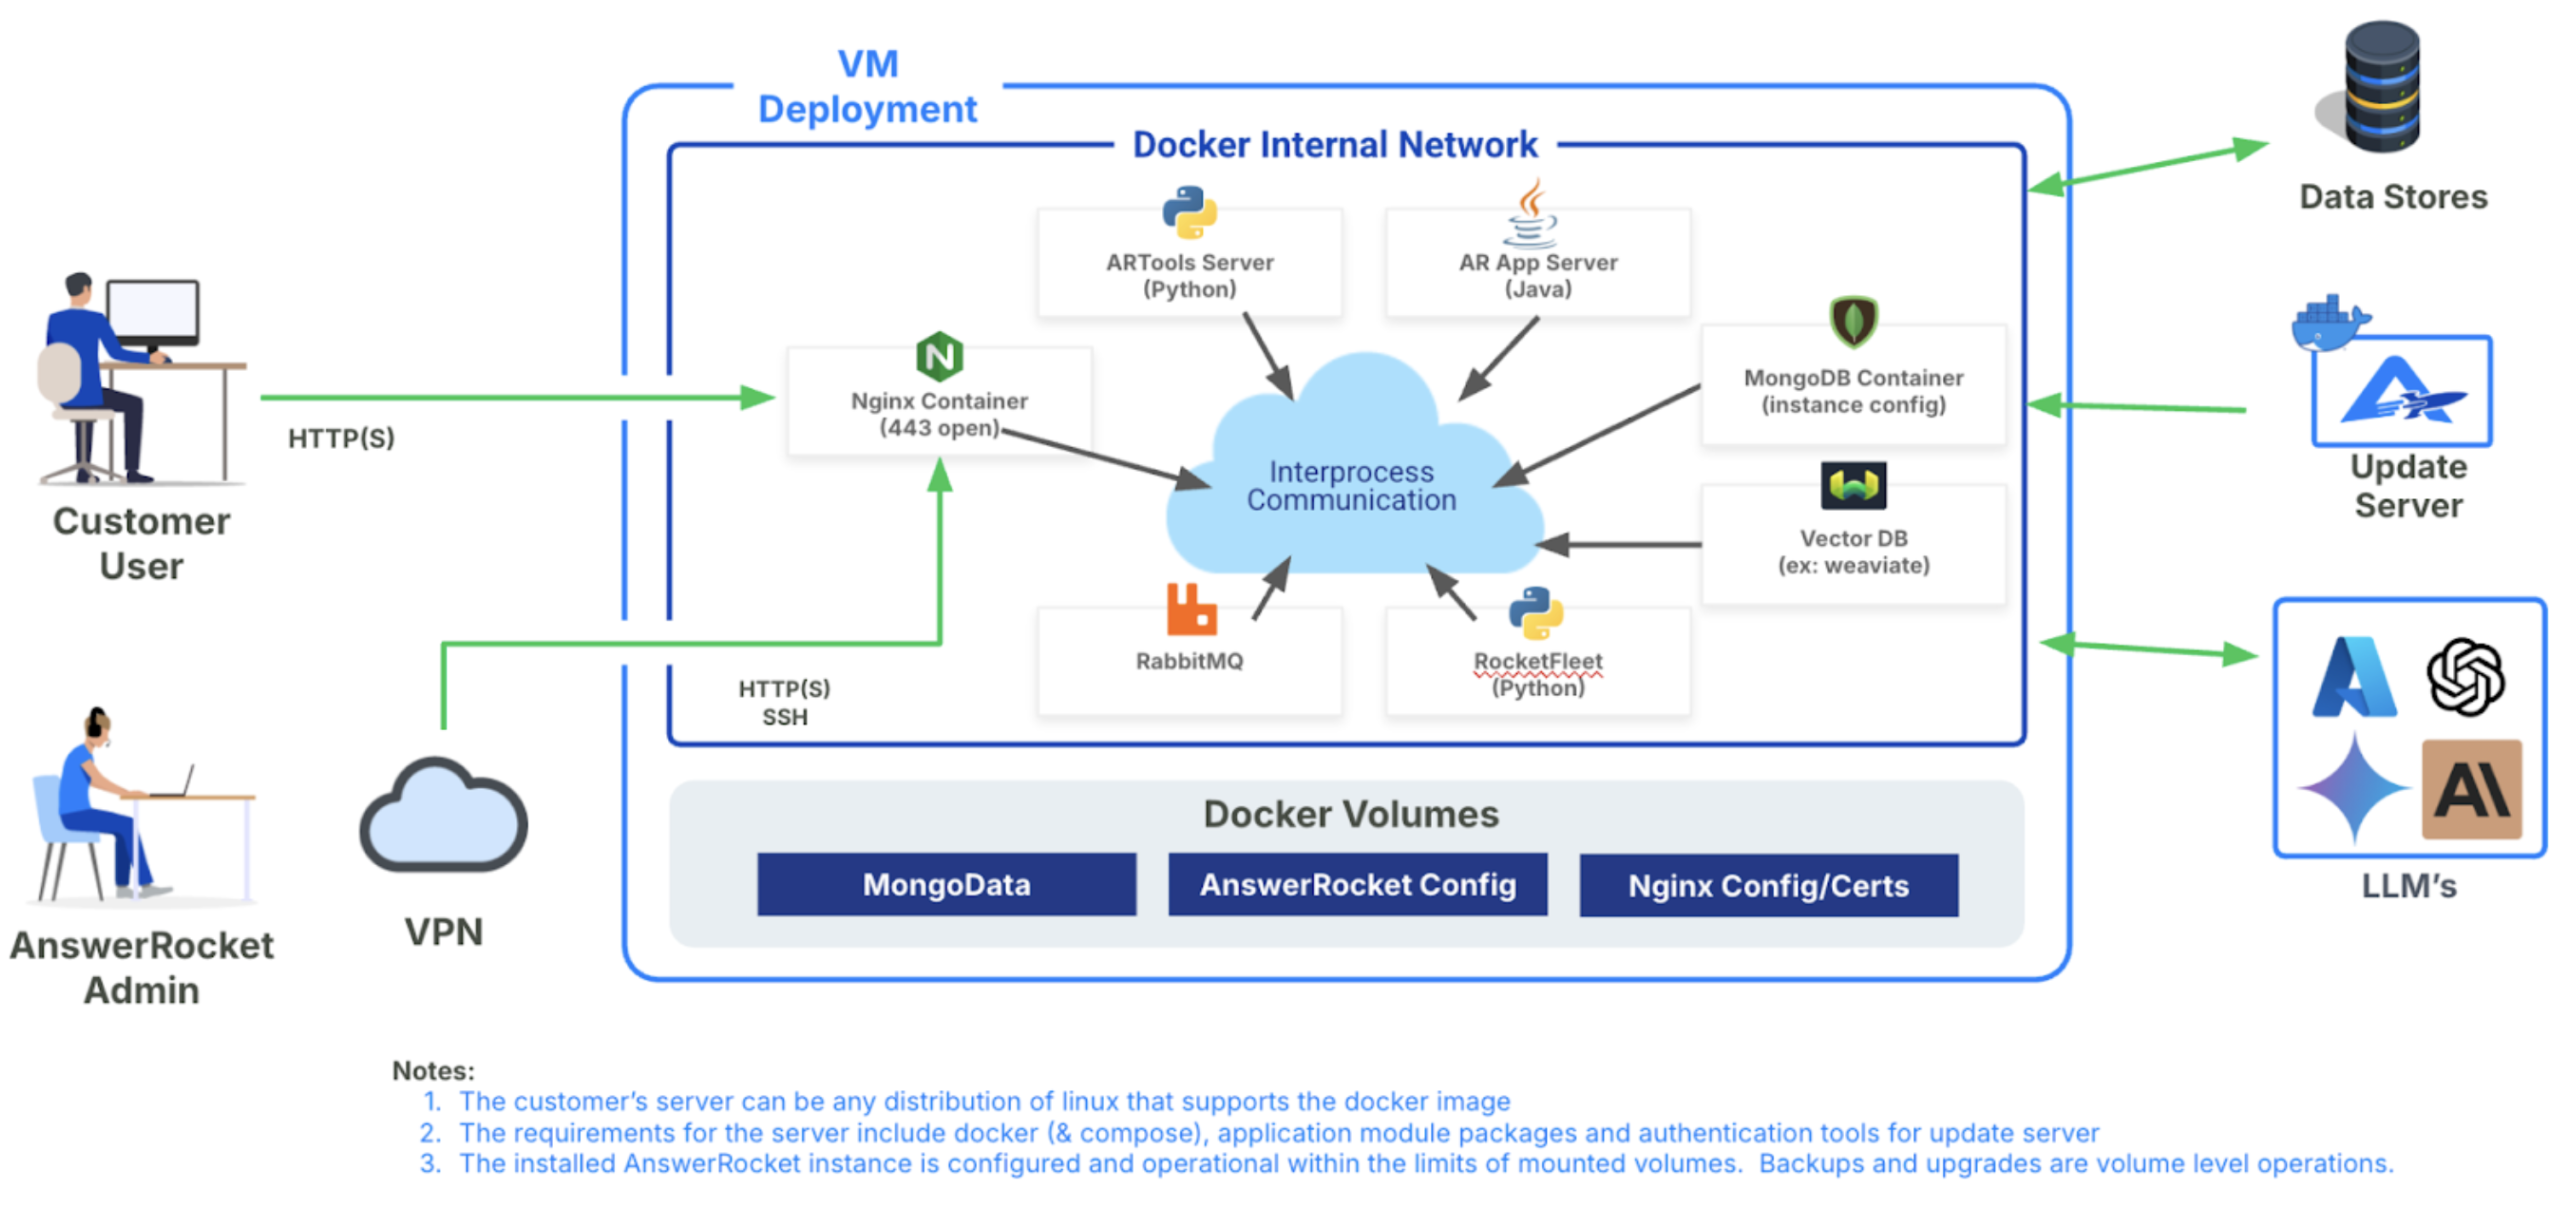
This document outlines the architecture, deployment strategy, configuration, and operational considerations for setting up and maintaining a multi-tenant environment for the AnswerRocket platform.
The shift from single-tenant-per-VM to multi-tenant-per-VM/container aims to optimize infrastructure efficiency while preserving tenant-level data and configuration isolation. However, you will still need to manage each tenant configuration (database, LLM, etc…) individually.
MaxAI Architecture
Single-Tenant Model
- Each client runs on a dedicated VM.
- One deployment per VM.
- Full environment isolation (URL, data, config).
- Straightforward but resource-intensive.
Multi-Tenant Model
- Single VM with container set shared by multiple tenants.
- Routing-based tenant segregation using domain or subdomain (e.g. customer1.example.com, customer2.example.com).
- Tenants configured via a JSON-based config system.
Configuration
- MongoDB: Each tenant gets its own database automatically (e.g., max_customer1, max_customer2, etc.).
- SSL Certificates: Create individual certificates per domain or use a wildcard certificate for .dev.answerrocket.com and .answerrocket.com.
- DNS: All domains point to the same VM IP or load balancer. The application routes based on the first subdomain.
- Data Isolation: Each tenant’s data is stored in its own MongoDB database within the same container.
How Subdomain Routing Works
1. Application’s Hostname Processing
- Extracts the leading subdomain from the request hostname.
- Looks it up in the TenantUrlOverlayMap.
- Maps it to a tenant ID.
- Routes to the tenant’s config and data.
2. Example TenantUrlOverlayMap
"TenantUrlOverlayMap": {
  "customer1": "customer1",
  "customer2": "customer2",
  "customer3": "customer3",
  "customer4": "customer4"
}
3. Example Routing Table
| Hostname | Leading Subdomain | Maps to Tenant | Database |
|---|---|---|---|
| customer1.dev.answerrocket.com | customer1 | customer1 | max_customer1 |
| customer2.dev.answerrocket.com | customer2 | customer2 | max_customer2 |
| customer3.answerrocket.com | customer3 | customer3 | max_customer3 |
| customer4.answerrocket.com | customer4 | customer4 | max_customer4 |
4. Subdomain-Agnostic Routing
- Only the first subdomain matters for routing.
- Example: customer1.test.answerrocket.com → routes to tenant customer1
5. Routing Flow
- Request hits load balancer.
- Forwarded to application VM.
- Hostname is parsed → extract leading subdomain.
- Subdomain maps to tenant.
- Application loads that tenant’s config.
- Connects to tenant’s MongoDB.
- Serves response with tenant-specific data.
6. Verification
- Check application logs to verify tenant mapping.
- Tenant IDs must be valid subdomain strings.
SSL/TLS Considerations
- Prefer handling certificates at the Load Balancer.
- Offloading simplifies certificate and domain management.
Data Isolation & Security
- MongoDB stores are isolated per tenant.
- No cross-tenant data visibility.
- Skills, documents, and queries are tenant-scoped.
Skill Execution & Agent Isolation
- Skills and assistants (soon called agents) are scoped per tenant.
- Shared Git repos for skill codebases may be supported in the future.
- Each tenant can use common skills while maintaining independent configs.
Performance & Scaling Guidelines
Base Recommendations
| Tenant Load | Recommended VM Specs |
|---|---|
| 1 Tenant | 4 vCPU, 16 GB RAM |
| 2–4 Tenants (Moderate) | 8 vCPU, 32 GB RAM |
| 250 Users / High Query | 4 vCPU, 32–64 GB RAM |
Sizing Factors
- Concurrency (active users)
- Skill complexity (data processing)
- Query volume (e.g. 20k rows)
- Cache reuse/locality
📌 Memory is often the limiting factor, not CPU.
Deployment & Maintenance Considerations
Pros
- Reduced infrastructure footprint
- Easier VM management
- Centralized deployment of containers
Cons
- Single-point failure risk (misconfig affects all tenants)
Document and Skill Access Considerations
- Documents are shared within a tenant.
- No cross-tenant document visibility.
Multi-Tenant Setup Instructions (Example.com)
- Connect to the server and switch to the max user:
sudo su max
cd /opt/answerrocket/volumes/json\_config
ls -la- Backup the current config:
cp /opt/answerrocket/volumes/json_config/system_config.json /opt/answerrocket/volumes/json_config/system_config.json.bak- Update
system_config.json:
"TenantList": ["customer1", "customer2", "customer3", "customer4"],
...
"TenantUrlOverlayMap": {
    "customer1": "customer1",
    "customer2": "customer2",
    "customer3": "customer3",
    "customer4": "customer4"
}- Create tenant directories:
mkdir -p customer1 customer2 customer3 customer4
cp example/* customer1/
cp example/* customer2/
cp example/* customer3/
cp example/* customer4/- Update configs per tenant
sed -i 's/example/customer1/g' customer1/*
sed -i 's/example/customer2/g' customer2/*
sed -i 's/example/customer3/g' customer3/*
sed -i 's/example/customer4/g' customer4/*- Restart the app using
internal-compose.shif SSL cert on load balancer ORprod-compose.shif SSL cert on server:
cd /opt/answerrocket

# If SSL on Load Balancer
./scripts/internal-compose.sh down
./scripts/internal-compose.sh up -d

# If SSL on server
./scripts/prod-compose.sh down
./scripts/prod-compose.sh up -d
6. DNS Setup (e.g. AWS Route53):
Create CNAME or A records pointing to the server IP or Load Balancer like so given the example above:
- customer1.dev.example.com → alb.example.com
- customer2.dev.example.com → alb.example.com
- customer3.example.com → alb.example.com
- customer4.example.com → alb.example.com
Database Configuration
Databases in the mongodb container will automatically be created for each tenant on application startup or restart based on whats configured in you system_config.json.